Tutorial – Spring Boot Application Development Using STS
Spring Boot is a framework/tool suite for building spring based web applications. It has a set of tools for quick development/deployment of spring based applications. Using a set of default conventions it enables developers to quickly develop apps with very little configuration. It even has an embedded tomcat web server for quickly running applications as a standalone app!
Following are some of the main benefits of using Spring boot for web application development,
- Quickly integrate various spring framework components such as Spring web MVC, Spring AOP, Spring ORM etc.
- Quickly develop and run web applications using embedded Tomcat server.
- Spring Tool Suite (STS) IDE has built-in support for building spring boot applications.
The following tutorial provides a step by step guide on starting spring boot web application development using spring tool suite (STS). This tutorial assumes that you already have Java JDK 1.8 or above installed in your machine. We also assume that the gradle build system (instead of maven) is used for developing applications.
Step 1: Install Spring Tool Suite (STS)
Spring Tool Suite is an eclipse based IDE designed for building spring applications. By default it comes with tools for quickly creating Spring boot applications.
You can download latest version of Spring Tool Suite (STS) from here. Downloads are available for Mac, Windows and Linux operation systems. Choose the version appropriate for your operating system. For this tutorial, I have downloaded STS 3.8.3 for Mac (based on Eclipse 4.6.2).
Extract the downloaded zip file into a folder of your choice. Run the STS executable to verify that STS is ready for development.
Step 2: Install Gradle BuildShip Plugin
STS has a built-in gradle plugin developed by SpringSource. However it is now preferred to use Buildship gradle plugin from Gradle Inc.
The latest version of Buildship is 2.x. However STS 3.8.3 has a bug which prevents it from working with Buildship 2.0 plugin. Hence if you are using STS 3.8.3, you need to install Buildship 1.x plugin. Note that for STS 3.8.4 (not released as of February 2017) or above you can use Buildship 2.0.
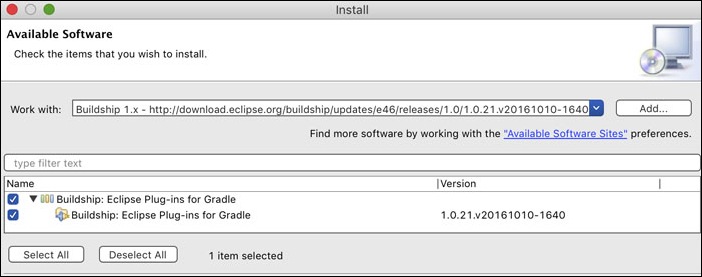
To install Buildship 1.x From STS, click on Help => Install New Software. In the work with field, add the URL to the Buildship 1.0.21 plug-in for Eclipse Neon. Install the Buildship 1.0.21 version listed.

Note that if you haven't installed the Gradle Buildship plugin properly, you will get the following error when you try to create a spring starter project,
Can not import using Gradle (Buildship) because Buildship Gradle Tooling is not installed. You can install it from Eclipse Marketplace.
Step 3: Create a Spring Boot Starter Project
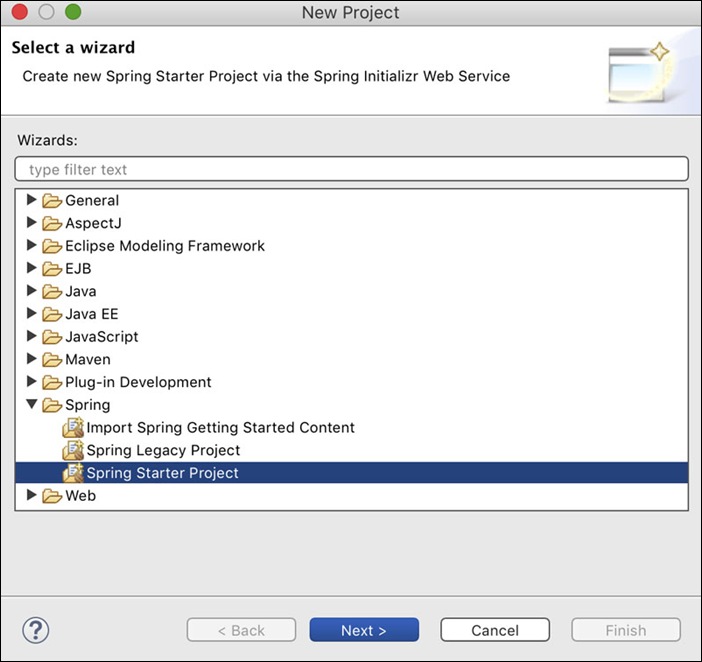
From STS, click on File => New => Project. Select Spring Starter Project as shown below and click next.

In the next screen, enter the name of the application (DemoApp) and then select type as gradle (Buildship). Then you need to enter the various packaging parameters for your project. I have used the following values for this demo project. These values follow Maven conventions.
- Group - com.quickprogrammingtips.demoapps
- Artifact - demoapp
- Version - 0.0.1-SNAPSHOT
- Description - Spring Boot Demo App
- Package - com.quickprogrammingtips.demoapps

Click next. In the next screen select the version of Spring Boot (1.5.1) for the project. You can also select various features you need as dependencies. For example, if you are using any of the core spring libraries such as AOP, you can select it under the core folder. In this tutorial we are building a simple Spring boot web application with spring web mvc. Hence we will only select web dependency under web folder as shown below,

Click on finish. You now have a ready to run spring boot web application based on spring web mvc! The newly created spring boot application contains the following files,
- DemoAppApplication.java - This is the entry point of the spring boot application.
- build.gradle - This file contains gradle build configuration including all the dependencies of the project. There is only one dependency on spring-boot-starter-web which in turn has transitive dependencies on a number of projects including spring-web, spring-web-mvc, spring-boot-starter and spring-boot-starter-tomcat.
Following is the build.gradle contents,
buildscript {
    ext {
        springBootVersion = '1.5.2.RELEASE'
    }
    repositories {
        mavenCentral()
    }
    dependencies {
        classpath("org.springframework.boot:spring-boot-gradle-plugin:${springBootVersion}")
    }
}

apply plugin: 'java'
apply plugin: 'eclipse'
apply plugin: 'org.springframework.boot'

jar {
    baseName = 'demoapp'
    version = '0.0.1-SNAPSHOT'
}

sourceCompatibility = 1.8

repositories {
    mavenCentral()
}


dependencies {
    compile('org.springframework.boot:spring-boot-starter-web')
    testCompile('org.springframework.boot:spring-boot-starter-test')
}
Step 4: Running the Spring Boot Project in STS
To run the newly created spring boot application, right click the project and select Run As => Spring Boot App. This actually calls the main method of the DemoAppApplication.java which in turn calls the SpringApplication.run method. Internally this method creates an instance of embedded Tomcat server at the default port of 8080 and runs application in it.
Open a browser window and enter the URL - http://localhost:8080/. You will see the following error from the Spring boot application.

You are getting this error since you haven't added any spring web mvc controllers to handle any web requests. Let us do that now!
Step 5: Responding to Web Requests in Spring Boot
Create a new class with the name HelloController.java under the same package where DemoAppApplication.java is located. Copy the following code,
package com.quickprogrammingtips.demoapps;

import org.springframework.stereotype.Controller;
import org.springframework.web.bind.annotation.RequestMapping;
import org.springframework.web.bind.annotation.ResponseBody;

@Controller
public class HomeController {
    @RequestMapping("/")
    @ResponseBody
    String home() {
        return "Hello World!";
    }
}
From console stop and rerun the application. Now access the URL http://localhost:8080/ again. You should see Hello World! printed on the browser. Congratulations!, you have created a web application using spring boot.
How do I return a JSON Output Using Spring Controllers?
These days most backend applications are written as microservices with JSON output. Returning JSON in spring web mvc is easy. Just wrap your output in an object with getter methods and spring will automatically convert it to JSON output. Here is the modified HomeController.java which returns Hello World! greeting as JSON output,
package com.quickprogrammingtips.demoapps;

import org.springframework.stereotype.Controller;
import org.springframework.web.bind.annotation.RequestMapping;
import org.springframework.web.bind.annotation.ResponseBody;

class Greeting {
	String greeting;
	Greeting(String g) {
		greeting = g;
	}
	public String getGreeting() {
		return greeting;
	}
}

@Controller
public class HomeController {
    @RequestMapping(value="/",produces = "application/json")
    @ResponseBody
    Object home() {
        return new Greeting("Hello World!");
    }
}
And voila! you now have microservice endpoints with JSON output!